RFM69HCW 아두이노 쉴드 -434Mhz
(RFM69HCW Arduino Shield -434 Mhz)


개요
- 본 제품은 434Mhz RFM69HCW RF 모듈을 탑재한 아두이노 쉴드입니다.
- 무선 센서 네트워크 등을 구성하고자 할때 많이 사용하는 제품으로 500미터거리까지 통신이 가능합니다.
- RFM69HCW는 SPI인터페이스를 사용하여 아두이노와 통신하며, 아두이노 라이브러리가 있어 쉽게 프로토타이핑이 가능합니다.
- 네트워크당 255개의 노드를 지원가능하며, AES 암호화 알고리즘을 지원하여 데이터를 안전하게 보호합니다.
- 66바이트 길이의 패킷을 전송할 수 있습니다.
- 쉴드는 보드상에 레귤레이터 및 레벨 쉬프트 회로를 가지고 있습니다.
특징
- Sensitivity = -118 dBm
- +17 dBm Max Output Power (Configurable)
- Data Rate = 1 to 128 kbps
- Digital RSSI
- Wake-on-radio
- Configurable packet structure
- Preamble detector
- TX and RX 64 byte FIFOs
- Low battery detector
- Temperature sensor and 8-bit ADC
- -40 to +85 °C temperature range
- Transmit power: -18dBm (0.016mW) to +20dBm (100mW) in 1dBm steps
- Receive sensitivity: down to -120dBm at 1.2kbps
- Standby current:200uA
- Bit rates : 1.2kbps to 300kbps
- Work voltage: 5V
- Current consumption: 0.1uA sleep, 1.25mA standby, 16mA receive, 130mA transmit (max)
- Encryption: AES 128-bit (optional)
- Packet buffer (FIFO): 66 bytes
문서
- RFM69 Library and example
- schematic
- 두개의 RFM69 쉴드를 준비합니다.
- 위의 라이브러리를 다운받아 아두이노 IDE에 설치합니다.
- 각각의 쉴드를 아두이노와 결합한 후에 첫번째 노드의 예제코드에서 NETWORKID를 찾아 값을 0으로 변경합니다.
- 이 네트워크 ID가 노드들이 접속하는 네트워크 아이디로 이 네트워크에 접속하고자 하는 노드는 모두 같은 네트워크 ID를 가지고 있어야 합니다. 네트워크 아이디는 0에서 255사이에서 아무 숫자나 사용할 수 있습니다.
- 그 다음 #define MYNODEID 라인을 찾아서, 값을 1로 변경합니다. 이것은 현재 코드를 수정하고 있는 첫번째 노드의 주소가 됩니다.
- 그 다음 #define TONODEID 라인을 찾아서 값을 2로 변경합니다. 이것은 통신을 하고자 하는 상대편 노드의 주소 아이디입니다. 2로 설정되었고 실제로 노드2의 MYNODEID는 2로 설정되어 있어야 합니다.
- 그 밑으로 RFM69HCW 의 주파수를 설정하는 부분이 나오는데, 이 보드는 433Mhz 이므로 해당 부분의 코맨트를 제어하여 줍니다.
- AES 암호화 알고리즘을 사용하려면 #define ENCRYPT 라인을 찾아 TRUE로 값을 변경하여 줍니다. 그리고 16비트 키를 임의로 만들어 ENCRYPTKEY 값에 적어 줍니다. 이 키값은 모든 노드들이 같은 값을 공유하여야 합니다.
- acknowledge기능을 사용하려면, USEACK 을 TRUE로 변경합니다. 사용하지 않으려면 FALASE로 놓습니다. 이 값 또한 모든 노드들이 동일한 값을 가지고 있어야 합니다.
- 그 다음 노드 2를 설정합니다.
- #define MYNODEID라인을 찾아 2로 설정합니다.
- #define TONODEID 라인을 찾아 1로 설정합니다.
- 각각의 수정된 코드를 업로드합니다.
#include <RFM69.h>
#include <SPI.h>

// Addresses for this node. CHANGE THESE FOR EACH NODE!

#define NETWORKID     0   // Must be the same for all nodes
#define MYNODEID      1   // My node ID
#define TONODEID      2   // Destination node ID

// RFM69 frequency, uncomment the frequency of your module:

#define FREQUENCY   RF69_433MHZ
//define FREQUENCY     RF69_915MHZ

// AES encryption (or not):

#define ENCRYPT       true // Set to "true" to use encryption
#define ENCRYPTKEY    "TOPSECRETPASSWRD" // Use the same 16-byte key on all nodes

// Use ACKnowledge when sending messages (or not):

#define USEACK        true // Request ACKs or not

// Packet sent/received indicator LED (optional):

#define LED           9 // LED positive pin
#define GND           8 // LED ground pin

// Create a library object for our RFM69HCW module:

RFM69 radio;

void setup()
{
  // Open a serial port so we can send keystrokes to the module:

  Serial.begin(9600);
  Serial.print("Node ");
  Serial.print(MYNODEID,DEC);
  Serial.println(" ready");

  // Set up the indicator LED (optional):

  pinMode(LED,OUTPUT);
  digitalWrite(LED,LOW);
  pinMode(GND,OUTPUT);
  digitalWrite(GND,LOW);

  // Initialize the RFM69HCW:

  radio.initialize(FREQUENCY, MYNODEID, NETWORKID);
  radio.setHighPower(); // Always use this for RFM69HCW

  // Turn on encryption if desired:

  if (ENCRYPT)
    radio.encrypt(ENCRYPTKEY);
}

void loop()
{
  // Set up a "buffer" for characters that we'll send:

  static char sendbuffer[62];
  static int sendlength = 0;

  // SENDING

  // In this section, we'll gather serial characters and
  // send them to the other node if we (1) get a carriage return,
  // or (2) the buffer is full (61 characters).

  // If there is any serial input, add it to the buffer:

  if (Serial.available() > 0)
  {
    char input = Serial.read();

    if (input != '\r') // not a carriage return
    {
      sendbuffer[sendlength] = input;
      sendlength++;
    }

    // If the input is a carriage return, or the buffer is full:

    if ((input == '\r') || (sendlength == 61)) // CR or buffer full
    {
      // Send the packet!


      Serial.print("sending to node ");
      Serial.print(TONODEID, DEC);
      Serial.print(", message [");
      for (byte i = 0; i < sendlength; i++)
        Serial.print(sendbuffer[i]);
      Serial.println("]");

      // There are two ways to send packets. If you want
      // acknowledgements, use sendWithRetry():

      if (USEACK)
      {
        if (radio.sendWithRetry(TONODEID, sendbuffer, sendlength))
          Serial.println("ACK received!");
        else
          Serial.println("no ACK received");
      }

      // If you don't need acknowledgements, just use send():

      else // don't use ACK
      {
        radio.send(TONODEID, sendbuffer, sendlength);
      }

      sendlength = 0; // reset the packet
      Blink(LED,10);
    }
  }

  // RECEIVING

  // In this section, we'll check with the RFM69HCW to see
  // if it has received any packets:

  if (radio.receiveDone()) // Got one!
  {
    // Print out the information:

    Serial.print("received from node ");
    Serial.print(radio.SENDERID, DEC);
    Serial.print(", message [");

    // The actual message is contained in the DATA array,
    // and is DATALEN bytes in size:

    for (byte i = 0; i < radio.DATALEN; i++)
      Serial.print((char)radio.DATA[i]);

    // RSSI is the "Receive Signal Strength Indicator",
    // smaller numbers mean higher power.

    Serial.print("], RSSI ");
    Serial.println(radio.RSSI);

    // Send an ACK if requested.
    // (You don't need this code if you're not using ACKs.)

    if (radio.ACKRequested())
    {
      radio.sendACK();
      Serial.println("ACK sent");
    }
    Blink(LED,10);
  }
}

void Blink(byte PIN, int DELAY_MS)
// Blink an LED for a given number of ms
{
  digitalWrite(PIN,HIGH);
  delay(DELAY_MS);
  digitalWrite(PIN,LOW);
}
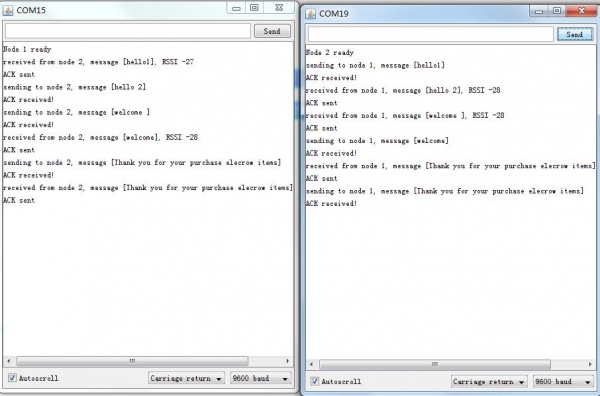
- 업로드 후에 각각의 아두이노 IDE의 시리얼 모니터 창을 엽니다.
- 시리얼 모니터창은 9600bps, Carrige return으로 설정합니다.
- 이렇게 설정이 완료 되면 한쪽창에서 타이핑하면 무선으로 전송되어 다른 창에 나타나게 됩니다.