라즈베리용 RTC 및 전원관리 보드 위티 파이 3
(WITTY PI 3: REALTIME CLOCK AND POWER
MANAGEMENT FOR RASPBERRY PI)
개요
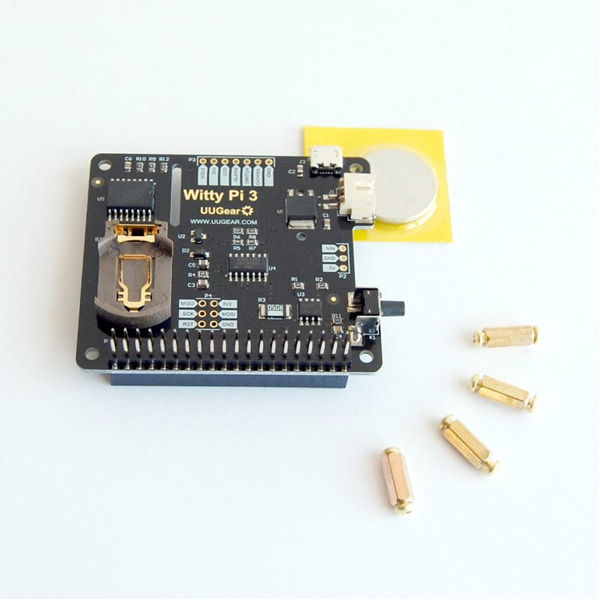
- 본 제품은 라즈베리용 RTC 및 전원관리 보드 위티 파이 3입니다.
- RTC (DS3231SN) 모듈을 탑재하고 있으며, 간단한 스크립트를 이용하여 복잡한 ON/OFF 시퀜스를 정의하여 전원을 관리할 수 있는 제품입니다.
- 라즈베리 파이 A+, B+, 2B, Zero, Zero W, 3B, 3B+, 3A+, 4B 와 사용이 가능합니다.
- 버튼 한번 눌러서 우아하게 라즈베리 파이를 on/off 시킬 수 있으며, 인터넷 접근 없이 정확한 시간을 알게 할 수 있습니다.
- 파이를 startup/shutdown 스케쥴링 할 수 있습니다.
- 탑재된 DS3231SN RTC 칩은 정교하며, 또 온도 센서를 내장하고 있어 파이 주위의 온도를 소프트웨어를 통해 읽을 수도 있습니다.
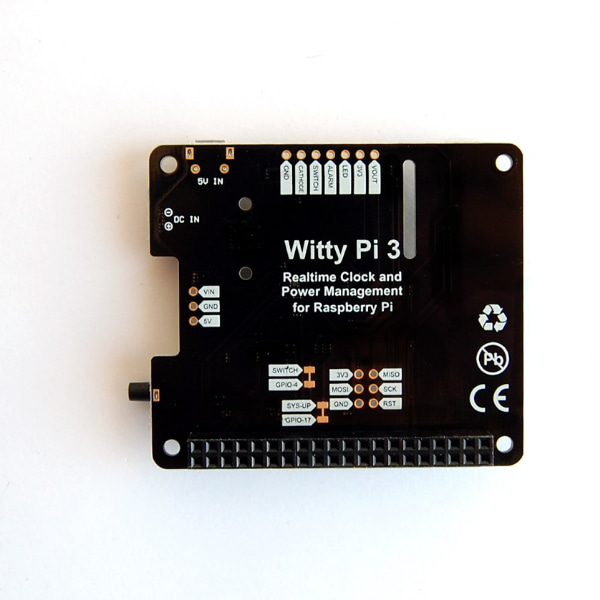
- I2C 인터페이스를 통해서 모든 설정을 할 수 있습니다.
특징
- Dimension: 65mm x 56mm x 19mm
Weight: 20g (net weight without battery)
Battery: CR2032 (for time and alarms keeping)
Power In: DC 5V (via micro USB) or DC 5.3V~26V (via XH2.54 connector, better no higher than 8V without additional heat sink)
Output Current: Up to 3A for Raspberry Pi and its peripherals if input via micro USB port. Up to 2A if input via XH2.54 connector.
Static Current: ~1mA
Operating Temperature: -30℃~80℃ (-22°F~176°F)
Storage Temperature: -40℃~85℃ (-40°F~185°F)
Humidity: 0~80%RH, no condensing - You can power your Raspberry Pi with higher voltage.
- You can gracefully turn on/off Raspberry Pi with single tap on the switch.
- After shutdown, Raspberry Pi and all its USB peripherals' power are fully cut.
- Raspberry Pi knows the correct time, even without accessing the Internet.
- Raspberry Pi knows the temperature thanks to the sensor in RTC chip.
- You can schedule the startup/shutdown of your Raspberry Pi.
- You can even write a script to define complex ON/OFF sequence.
- Shutdown Raspberry Pi when input voltage is lower than pre-set value.
- Turn on Raspberry Pi when input voltage raise to pre-set value.
- When the OS loses response, you can long hold the switch to force power cut.
문서
-
SOFTWARE
The Software for Witty Pi 3 is written with BASH (Unix shell).
The source code is public on Github: https://github.com/uugear/Witty-Pi-3
To install the software, just run these two commands:
123pi@raspberrypi:~ $ wget http://www.uugear.com/repo/WittyPi3/install.shpi@raspberrypi:~ $ sudo sh install.shAfter the installation is done, reboot your Raspberry Pi.
To launch the Witty Pi utility, just run these commands:
123pi@raspberrypi ~ $ cd wittypipi@raspberrypi ~/wittypi $ ./wittyPi.shMore details about software installation and usage could be found on the user manual.
CONFLICTION WITH 1-WIRE INTERFACE
If you have 1-Wire interface enabled and didn't specify the GPIO pin for 1-Wire, it will use GPIO-4 and that conflict with Witty Pi. Witty Pi uses GPIO-4 to receive shutdown command, if GPIO-4 is also assigned to 1-Wire, Witty Pi's software will receive shutdown command unexpectedly. If your Raspberry Pi always automatically shutdown itself after installing Witty Pi's software, that most probably due to the confliction with 1-Wire interface.
When this happens, you most probably can not login your Raspberry Pi because it always shuts itself down before you get the chance to login. To solve this problem, you will need to take out the micro-SD card on your Raspberry Pi, and access its file system via a card reader. You need to edit the config.txt file in the "boot" volume to change the GPIO pin used by 1-Wire interface, or you can disable 1-Wire interface if you don't need it for now. You need to find something like "dtoverlay=w1-gpio" in the file.
If you want 1-Wire to use GPIO-18, just change "dtoverlay=w1-gpio" to:
1dtoverlay=w1-gpio,gpiopin=18If you want to disable 1-Wire interface, just comment it out:
1#dtoverlay=w1-gpioSave the file and eject your micro SD card, and put it back to your Raspberry Pi. Now your Raspberry Pi should be able to boot normally.
SCHEDULE SCRIPT GENERATOR
You can now use our web app to create and debug the schedule script for Witty Pi.


